

How You Would Go About Getting A Update On The Server If The Server Lost Power And Booting Backup
Common Tasks - Operating System
This section will provide guides to some common tasks and data which you will demand in club to run, maintain, and edit your Abode Assistant Bone organization. For further details on any item subject area, brand sure to refer to the documentation for specific add-ons or topics listed here.
Update
Best practice for updating a Home Assistant installation:
-
Fill-in your installation, using the fill-in functionality Home Assistant offers.
-
Check the release notes for breaking changes on Home Assistant release notes. Be sure to check all release notes betwixt the version you are running and the ane you are upgrading to. Utilize the search function in your browser (
CTRL + f/CMD + f) and search for Breaking Changes. -
Check your configuration using the Check Domicile Assistant configuration addition.
-
If the bank check passes, you can safely update. If not, update your configuration accordingly.
-
Update Domicile Assistant.
To update Home Banana Core when y'all run Home Assistant Operating Organisation you take 2 options.
- Open up your Home Assistant UI
- Navigate to the Configuration console
- On the top you will be presented with an update notification
If you do not run across that notification you tin can click the overflow bill of fare in the top correct and select "Check for updates".
Run a specific version
In the issue that a Home Assistant Core version doesn't play well with your hardware setup, you can downgrade to a previous release. In this case 2022.v.3 is used as the target version simply you can cull the version you desire to run.
ha core update --version 2022.5.3 Run a beta version
If yous would like to test side by side release before anyone else, you can install the beta version.
- In your Dwelling house Assistant UI navigate to System > Updates
- Click the operflow menu in the top right corner
- Click "Join beta"
- Navigate to Configuration console
- Install the update that is presented to you
-
Join the beta channel
ha supervisor options --aqueduct beta -
Reload the supervisor
-
Update Dwelling Assistant core to the latest beta version
Run a development version
If you want to stay on the bleeding-edge Home Banana Core development branch, yous tin can upgrade to dev.
The dev branch is likely to be unstable. Potential consequences include loss of data and instance corruption.
-
Join the dev channel
ha supervisor options --aqueduct dev -
Reload the supervisor
-
Update Home Banana cadre to the latest dev version
Configuration check
Configuring access to files
Your Home Banana Operating server includes ii repositories past default: The official cadre add-on repository, and the community add-on repository. All of the add together-ons mentioned here tin can be installed by navigating to the add-on store using Settings > Add-ons > Addition Store in the UI.
1 of the get-go things to accept care of afterward installing Dwelling house Assistant OS is to provide yourself admission to files. There are several add-ons commonly used for this, and nigh users use a mix of various add together-ons. Default directories on the host are mapped to the add together-ons so that they can be accessed by the services any particular improver might provide. On the host arrangement these directories exist on the /data partition at /mnt/information/supervisor/.
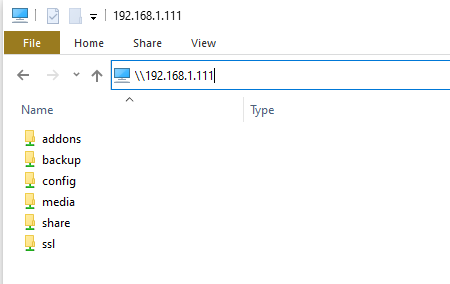
Using whatsoever of the add-ons listed below,the following directories are fabricated bachelor for admission:
-
addons -
backup -
config -
media -
share -
ssl
Installing and using the Samba add-on
The Samba add-on creates smb shares which can be accessed from some other calculator. You can also edit files using the editor of your preference from your client computer. This addition can be installed from the add-on shop's official repository.
To configure the Samba add-on, you just need to gear up a user and password of your choice on the configuration page, salvage, and then start the add-on. The addition will not offset without setting a countersign!
To connect to the Samba server from another device, you volition use the IP accost or hostname of your server. Either of these can be institute on the Settings > System > Network folio of your UI.
For connecting from Windows x, you tin can enter the IP address or hostname in File Explorer's address bar with two backslashes, equally shown in the instance screenshot.
You should then be prompted for the credentials y'all entered in the Samba add together-on configuration. You also have the option of having the credentials stored so that y'all exercise non need to enter them again. After that, y'all'll have access to the directories which you tin then mount as a drive or pivot to Quick Admission.
For OS Ten, connecting to the shares is a matter of using the Finder menu > Go > Connect to Server… Y'all would then enter the IP address or hostname of your Habitation Assistant Os instance as smb://your.ha.ip.address or smb://homeassistant and enter your credentials when prompted.
Installing and using the SSH addition (requires enabling advanced mode for the HA user)
The Terminal & SSH add-on provides admission over an SSH connection, and also includes nano and six editors. Information technology can be installed from the add-on shop'southward Official addition repository after enabling advanced mode for your Abode Assistant user'southward profile. Additionally, this addition provides access to the Dwelling Assistant Command Line Interface (CLI) which provides custom commands for checking logs, stopping and starting Dwelling house Assistant and add-ons, creating/restoring backups, and more. (See Home Assistant via Command Line for further info). The Terminal & SSH improver does not provide access to the underlying host file organisation.
To use the add-on, enter a password or public cardinal on its configuration page, then save and start the add-on.
The Final & SSH addition likewise provides a web terminal which allows yous to access a terminal via the Home Banana user interface. In society to access from an ssh client, a port needs to be entered in the network section of the add-on'southward configuration page.
Installing and using the Visual Studio Code (VSC) addition
The Visual Studio Code improver provides access through a feature packed web-based version of the Visual Studio Code editor and currently only supports AMD64 and aarch64/ARM64 machines. This add-on can exist installed in the addition store from the Community add-on repository. The add-on also provides access to the Home Assistant Control Line Interface (CLI) using VSC's built in terminal, which allows for checking logs, stopping and starting Home Assistant and add together-ons, creating/restoring backups, and more. (Run into Home Banana via Command Line for further info).
There is no configuration required for editing files within your /config directory. In society to enable access to other directories, it is necessary to edit the addition'southward configuration from its configuration tab. See the add together-on documentation for details.
Installing and using the File Editor add-on
A more basic and light weight alternative to Visual Studio Lawmaking, the File Editor add-on provides admission through Hass-Configurator, which is a web-based filesystem-browser and text-editor. YAML files are automatically checked for syntax errors while editing. This add-on tin can be installed via the add-on store from the official add-on repository.
At that place is no configuration required for editing files inside your /config directory. In order to enable access to further directories, editing the addition configuration is required. See the add-on documentation for details.
Backups
Backup of your Dwelling Assistant and add-on data and configuration. They are stored in a compressed annal file (.tar). Backups are made from the Supervisor Backups panel. At that place is also a service available that allows you to trigger the cosmos of a fill-in from an automation. Backups are stored in the /backup directory.
A full fill-in includes the following directories:
-
config -
share -
addons(but manually installed or created add-ons, not those installed from the store) -
ssl -
media
A partial backup consists of any number of the higher up default directories and installed add-ons.
Making a Backup from the UI
- Become to Settings > Organisation > Backups in the UI.
- Provide a name for the backup.
- Choose full or partial.
- Cull to password protect or not. Password-protected backups cannot easily be browsed outside of Abode Banana Bone.
- Click "Create" to begin the fill-in.
Restoring a Backup on a new install
Y'all can brand use of backup which you lot have copied off of a previous install to restore to a new installation during the onboarding process. Follow the link at the bottom of the account cosmos page to upload your backup from the previous installation.
For restoring a fill-in at any other time, visit the Supervisor fill-in panel in your UI and use the post-obit steps:
- Select "Upload Backup" from the icon in the upper right of the folio.
- Click on the folder icon to navigate to your backup .tar file and select information technology.
When the upload is completed, you will be presented with the backup restore dialog for restoring it, and tin then choose to restore in total or in function by manually selecting individual items.
If the backup you are uploading is more 1GB in size, information technology can exist faster and more efficient to brand use of the Samba add-on in order to transfer files to the /fill-in directory.
The length of time it takes to create or restore backup will depend on how much you lot have to compress or decompress.
If you're looking to slim down your fill-in, check if your configuration directory contains a large database file (dwelling-assistant_v2.db). Come across the recorder integration page for options to continue your database data down to a size that won't crusade issues. Note the keep days, purge interval, and include/exclude options.
When the restore is complete, Domicile Assistant volition restart to apply the new settings. You will lose the connexion to the UI and it will return one time the restart is completed.
Creating backup using the Abode Banana Control Line Interface
-
ha backups list- lists backups and their slugnames -
ha backups restore slugname- restores a specific fill-in -
ha backups new --proper name nameofbackup- create a backup
Use ha help to get more information most the control line usage.
Copying your backups to some other location
Yous oftentimes demand a backup in case your organization has crashed. If you merely store them on the crashed device, y'all won't be able to admission them easily. Nosotros recommend that you manually copy them from /backup to another machine on occasion. Or even ameliorate, create an automation to handle that, or make use of one of the following add-ons:
- Google Drive Backup
- Dropbox Sync
- Nextcloud Backup
- Samba backup
- Remote Backup (scp/rsync/rclone)
Home Assistant via the control line
 Home Assistant upgrade process from the SSH command line
On the SSH control line, you can apply the ha command to retrieve logs, bank check the details of continued hardware, and more.
Dwelling Assistant
ha core check ha core info ha core logs ha core options ha core rebuild ha core restart ha core start ha core stats ha cadre stop ha core update Supervisor
ha supervisor info ha supervisor logs ha supervisor reload ha supervisor update Host
ha host reboot ha host shutdown ha host update Hardware
ha hardware info ha hardware sound Usage examples
To update Home Assistant to a specific version, use the command:
ha core update --version ten.y.z Supplant x.y.z with the desired version similar --version 2022.5.3
You can get a ameliorate description of the CLI capabilities by typing ha help:
The Dwelling house Assistant CLI is a small and simple command line utility that allows you to control and configure dissimilar aspects of Home Banana Usage: ha [control] Available Commands: addons Install, update, remove and configure Home Assistant add-ons audio Audio device handling. authentication Hallmark for Abode Assistant users. backups Create, restore and remove backups banner Prints the CLI Dwelling Assistant banner forth with some useful information cli Get information, update or configure the Habitation Banana cli backend core Provides control of the Home Assistant Core dns Get information, update or configure the Home Assistant DNS server docker Docker backend specific for info and OCI configuration hardware Provides hardware data about your system assistance Aid about any command host Control the host/system that Home Banana is running on info Provides a general Home Assistant information overview jobs Go information and manage running jobs multicast Become information, update or configure the Dwelling Assistant Multicast network Network specific for updating, info and configuration imports observer Go data, update or configure the Habitation Banana observer os Operating System specific for updating, info and configuration imports resolution Resolution center of Supervisor, show issues and advise solutions supervisor Monitor, control and configure the Dwelling house Assistant Supervisor Flags: --api-token string Home Assistant Supervisor API token --config string Optional config file (default is $Dwelling/.homeassistant.yaml) --endpoint cord Endpoint for Home Banana Supervisor (default is 'supervisor') -h, --help assist for ha --log-level string Log level (defaults to Warn) --no-progress Disable the progress spinner --raw-json Output raw JSON from the API Use "ha [command] --assist" for more information most a control. Panel admission
You can also access the Dwelling house Banana Operating System via a directly connected keyboard and monitor, the console.
Lost Password and password reset
Please refer to the I'm locked out! documentation page.
Installing tertiary-party add together-ons
Dwelling house Assistant allows anyone to create improver repositories to share their add-ons easily. To try this locally, y'all tin use our instance addition repository at
https://github.com/domicile-banana/hassio-addons-case Domicile Assistant cannot guarantee the quality or security of third-political party add-ons. Use at your own take a chance.
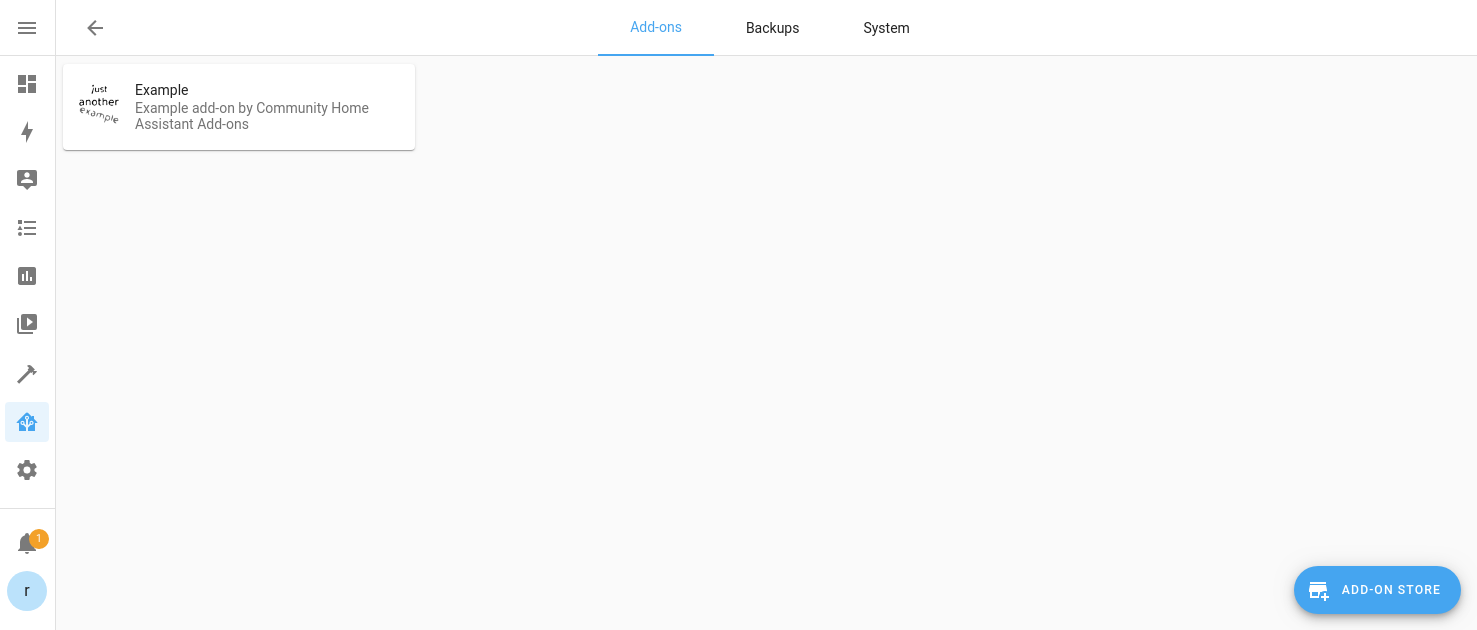 From Settings > Add-ons open the add-on store.
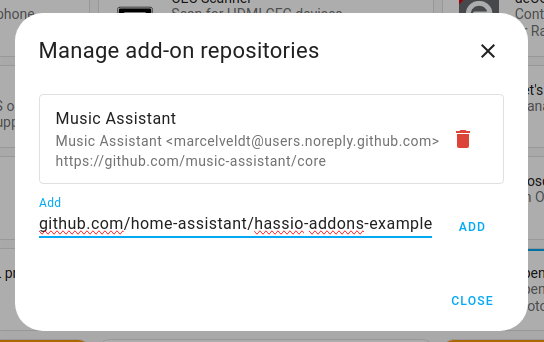 Add the URL of the repository and then press "Add". A new card for the repository will appear.
Assistance: Repository is not showing up
If y'all have added a repository, but it'due south not showing upwardly, it ways that the repository contains invalid configuration. Get to Settings > Organization > Logs to detect the Arrangement log. It should tell you what went incorrect. Report this information to the repository writer.
Using external Data Disk
Home Assistant Operating Arrangement supports storing virtually data on an external storage medium (east.chiliad. USB fastened SSD or HDD). This data deejay contains not only user data only also almost of the Home Banana software besides (Core, Supervisor etc.). This means a fast information disk volition make the organization overall much faster.

The information deejay feature can be used on an existing installation without losing data: The organization volition move existing data to the external data deejay automatically. However, it is recommended to create and download a total Backup before proceeding!
All data on the target disk will be overwritten!
The storage capacity of the external data disk must be larger than the storage capacity of the existing (boot) disk.
If yous have been using a data disk previously with Home Assistant Operating System, you need to employ your host reckoner to delete all partitions before using information technology as a data disk over again.
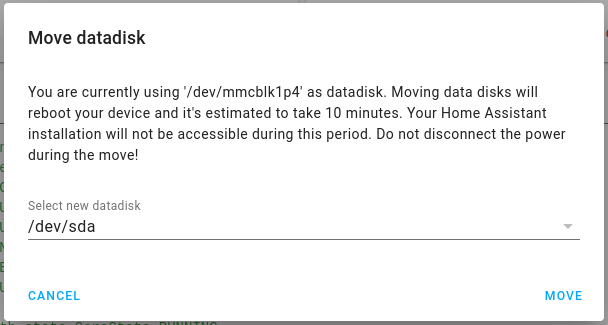
Using UI to move the data sectionalisation
- Connect the data disk to your organisation.
- Get to Settings > System > Storage in the UI.
- Press the three dots on the elevation right and choose "Motility datadisk"
- Select the data disk from the list of available devices.
- Press "Motion".
Using CLI to move the data partition
To come across the current information disk use:
$ ha os info ... data_disk: /dev/mmcblk1p4 ... To go a listing of potential targets which can be used by datadisk:
To initiate the movement to the new data disk use the move command:
ha os datadisk motion /dev/sdx The system volition set up the data deejay and immediately reboot. The reboot volition take 10 minutes or more depending on the speed of the new data disk; please be patient!
Using an USB fastened SSD tin can draw quite some power. For instance on Raspberry Pi iii the official Raspberry Pi power supply (PSU) just provides 2.5A which can exist as well tight. Use a more powerful power supply if you feel problems. Alternatively apply a powered USB hub. Connect the Hub to 1 of the USB slots of your Raspberry Pi, and connect the SSD to the Hub. In this setup the power supply of the Hub will power the attached device(s).
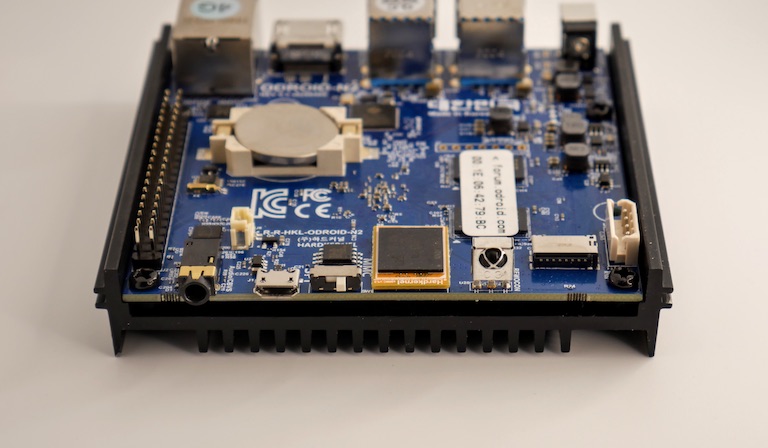
Flashing an ODROID-N2+
Home Assistant tin can exist flashed to an ODROID-N2+ past connecting the device directly to your figurer via the USB-OTG connection on the front of the board. The device contains the Petitboot bootloader, which allows the ODROID-N2+ storage to show up as information technology were a USB drive.
All these instructions work the same for the ODROID-N2 (non-plus version).
What yous will need
To wink your eMMC using Petitboot and OTG-USB, you will need the following items:
- HDMI cablevision and monitor
- USB keyboard
- USB 2.0 to micro-USB cable
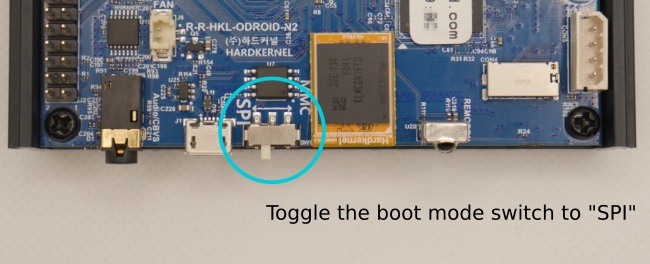
Enabling SPI kick way
To enable the SPI boot fashion:
-
Ability off the ODROID-N2+ by unplugging the power cable.
-
Remove the case.
-
Locate the toggle for boot mode and switch it from MMC to SPI.
-
Connect the ODROID-N2+ directly to your calculator via the USB-OTG port located on the front of the board.
-
Connect a USB keyboard and a monitor (using HDMI) to your ODROID-N2+.
-
Plug in the power cable to power on the ODROID-N2+.
Enabling USB drive mode
After The ODROID-N2+ is set up to SPI kick mode and powered on, it boots into a terminal. To enable the USB drive mode:
-
Select
Exit to shellfrom the carte du jour.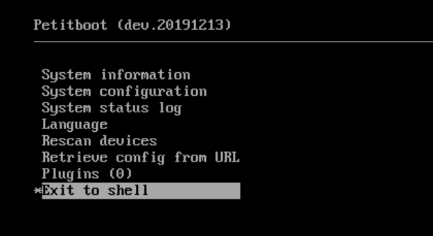
When using the command line, it may return the following bulletin: can't access tty; chore command turned off. You can safely ignore this message and proceed with the installation
-
Use the following command at the console to confirm the storage device node:
-
Set the storage device on the ODROID-N2+ as a mass storage device using the
umscommand (USB Mass storage mode). This will configure the ODROID-N2+ and OTG to act every bit a memory card reader:
Flashing Domicile Assistant
Connect the ODROID-N2+ to your PC via the micro-USB port at the forepart of the ODROID-N2+. When the ODROID-N2 is recognized as a USB connected storage device, you can wink the eMMC with Etcher using the latest stable version of Home Assistant OS for the ODROID-N2+ (haos_odroid-n2-7.6.img.xz).
When the flash process is consummate, disconnect the ODROID-N2+ from your PC and remove the ability cable. Remove the USB and HDMI cable, and make sure to toggle the boot mode switch back to MMC.
In one case it is dorsum in its case, connect your ODROID-N2+ to your network with an Ethernet cable and plug in power.
If your router supports mDNS, you will exist able to reach your installation on http://homeassistant.local:8123. If your network doesn't back up mDNS, you lot'll take to use the IP accost of your ODROID-N2+ instead of homeassistant.local. For example, http://192.168.0.ix:8123. You should be able to find the IP address of your ODROID-N2+ from the admin interface of your router.
Enable I2C
Home Assistant using the Home Assistant Operating System which is a managed environment, which ways you can't use existing methods to enable the I2C bus on a Raspberry Pi. In order to employ I2C devices you volition have to
- Enable I2C for the Home Banana Operating System
- Setup I2C devices due east.thou. sensors
Enable I2C with an SD card reader
Access the kick segmentation
You lot will need:
- SD card reader
- SD card with Home Assistant Operating System flashed on information technology
Shutdown/plow-off your Home Assistant installation and unplug the SD card. Plug the SD bill of fare into an SD card reader and find a drive/file system named hassos-boot. The file organisation might exist shown/mounted automatically. If not, employ your operating systems disk management utility to find the SD card reader and brand sure the kickoff partition is available.
Add files to enable I2C
- In the root of the
hassos-bootpartitioning, add a new folder calledCONFIG. - In the
CONFIGfolder, add another new folder calledmodules. - Within the
modulesfolder add a text file calledrpi-i2c.confwith the following content: - In the root of the
hassos-bootsectionalization, edit the file calledconfig.txtadd together two lines to information technology:dtparam=i2c_vc=on dtparam=i2c_arm=on
Beginning with the new OS configuration
- Insert the SD bill of fare dorsum into your Raspberry Pi.
- On startup, the
hassos-config.servicewill automatically pickup the newrpi-i2c.confconfiguration. - Another reboot might be necessary to make certain the merely imported
rpi-i2c.confis nowadays at boot time.
Enable I2C via Dwelling Assistant Operating System Last
Alternatively, past attaching a keyboard and screen to your device, you lot tin access the physical terminal to the Home Assistant Operating Organization.
You tin can enable I2C via this terminal:
-
Login as
root. -
Blazon
loginand press enter to access the shell. -
Blazon the following to enable I2C, yous may demand to supervene upon
sda1withsdb1ormmcblk0p1depending on your platform:mkdir /tmp/mnt mount /dev/sda1 /tmp/mnt mkdir -p /tmp/mnt/CONFIG/modules echo -ne i2c-dev>/tmp/mnt/CONFIG/modules/rpi-i2c.conf repeat dtparam = i2c_vc =on >> /tmp/mnt/CONFIG/config.txt echo dtparam = i2c_arm =on >> /tmp/mnt/CONFIG/config.txt sync reboot
Troubleshooting
After rebooting the host there should be i2c-0 and like device files in /dev. If such device files are missing, enabling I2C failed for some reason. Y'all tin cheque the condition of I2C kernel modules by using lsmod | grep i2c in the last. If they are loaded, you should find at to the lowest degree the entry i2c_dev. Active usage of the modules is indicated by a number, east.g. i2c_dev 20480 two would indicate two agile I2C device files.
An active I2C can besides be checked with a multi meter showing 3.iii 5 on the I2C pins GPIO2 and GPIO3.
Help us to ameliorate our documentation
Suggest an edit to this page, or provide/view feedback for this page.
Source: https://www.home-assistant.io/common-tasks/os/
Posted by: keyyouts1951.blogspot.com
0 Response to "How You Would Go About Getting A Update On The Server If The Server Lost Power And Booting Backup"
Post a Comment